
It’s always nice to bring in Rosh Hashanah (the Jewish New Year) with something sweet. So what could be sweeter and more delicious than a homemade batch of Rugelach? These were always my favorite Jewish dessert when I was younger, probably second to rainbow cookies. I always used to pick off the sugared chocolate chips. I actually still do, but we’ll keep that a secret. But a chocolate cinnamon filling paired with my sweet creamy dough really hits the spot and even makes me want to eat the entire cookie, not just the chips!
Rugelach, which literally means “little twists” in Yiddish, has Jewish Ashkenazic (Polish) origins. In Europe the dough was made with yeast so that it would be pareve (no dairy ingredients), and so it could be eaten with or after a meat meal and still be kosher. American Jews later introduced a cream cheese based rugelach dough. Rugelach dough is traditionally rolled around sweet fillings such as chocolate, raisins and nuts, or preserves.
These Rugelach were actually very easy and fun to make. The one suggestion I have before making these is to refrigerate the dough for at least 2 hours before baking so that the dough is easier to shape.
CHOCOLATE CHIP RUGELACH
Ingredients
DOUGH:
1 cup white flour
1 cup whole wheat flour
1/4 cup turbinado sugar
1/2 tsp salt
2 sticks unsalted butter (softened)
8 oz fat free cream cheese (softened)
1 tsp vanilla
1 large egg yolks
FILLING:
3/4 cup mini chocolate chips
3/4 cup chopped pecans (toasted)
1/2 c turbinado sugar
1 tbsp unsweetened cocoa powder
3 tsp cinnamon
1/4 cup raisins (optional)
GLAZE:
1 egg yolk
1/4 cup sugar
1/8 cup water
1. Whisk the white flour, whole wheat flour, and the salt in one bowl.
2. Beat the softened butter and cream cheese until well blended (about 2-3 minutes) and then add the sugar.
3. Add the egg yolks and vanilla to the batter, incorporating the ingredients one at a time until blended.
4. Add the flour mixture to the batter in half cup increments and mix with a spoon until blended.
5. Knead the dough on a floured surface and then divide it into three disks. Cover the dough with plastic wrap and refrigerate it for at least two hours.
6. While the dough refrigerates, combine the sugar, cinnamon, and cocoa powder in one bowl. In another bowl, combine the mini chocolate chips, chopped pecans, and raisins.
7. At this time you can also combine the egg yolk, sugar, and water for the glaze in a small bowl. You should keep this mixture refrigerated.
8. Once the dough is chilled preheat your oven to 350 degrees. You can now unwrap one disk and roll it out onto a flat surface between a sheet of wax paper (on the botton) and the plastic wrap on top. Roll the dough into a circle that is approximately 1/4 inch thick.
9. After the dough is rolled take 1/3 of the sugar mixture and spread it across the circle leaving a 1/2 inch border around the edge. Then take about 1/3 of the mini chocolate chip/chopped pecan/raisin mixture and spread it on top of the sugar mixture. Then put the plastic wrap you’d previously used over the circle and gently roll the toppings into the dough.
10. Once the toppings are somewhat set in the dough take off the plastic and divide the mixture with a pie cutter or pizza cutter into 12 triangular pieces.
11. The carefully take the wide side of the triangle and roll it up into the center of the circle. Use this technique to roll up the remaining pieces and then continue the process from the beginning with the other two disks.
12. You may want to refrigerate the first and second batch of disks while you finish rolling the remaining disks (prior to baking them).
13. Once all the Rugelach are rolled, you can brush the glaze you had made earlier on the tops. You may want to sprinkle some extra cinnamon or sugar on the tops before baking them.
14. You can now place the Rugelach on baking sheets lined with wax paper. The wax paper prevents the Rugelach from sticking to the sheet.
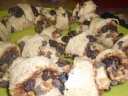
15. Bake the Rugelach for approximately 20-30 minutes until slightly golden on top. Cool the Rugelach on wire racks until room temperature and then serve! You should store in an air tight container for up to five days.
-

- Chips, Cinnamon, & Sugar
-
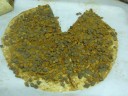
- Rugelach before it's cut
-
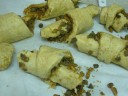
- Unbaked Rugelach
-
- More Unbaked Rugelach
-
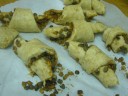
- Unbaked Rugelach with Raisins
-
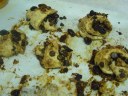
- Baked Rugelach
-
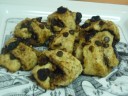
- More Baked Rugelach


